After the war Jofre admitted his generalship was unbalanced by a fixation on the threat of a British attack from the south, but the fundamental flaw was to have ignored the principle of concentration. Now the range had closed, however, he hoped the Army artillery under Brigade command, would break up any enemy attack before it closed with the infantry. The gunners had defied all efforts to knock them out, making a virtue of the regular necessity to re-site their self-burying weapons by leaving mockups behind to draw enemy fire. Akhurst, the Battery Commander attached to 45 Commando, ruefully admitted that he wasted much of his counter-battery fire on old tires and sections of drainpipe under camouflage nets.*
- Before 13-14 June British air attacks, naval gunfire and land counter-battery fire disabled no mortars, no rocket launchers and only one gun each in GA 3, GAA 4 and the Marine battery.
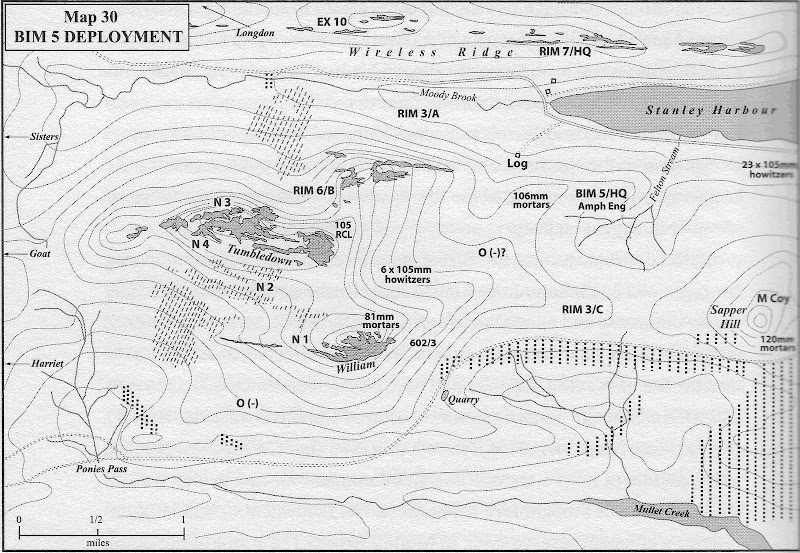 Robacio’s sector was, on paper, a tough nut to crack. He had the Marine battery of howitzers plus four 105mm rocket launchers, four 120mm, six 106mm and six 81mm mortars under his direct command. Two more rocket launchers, six 60mm mortars, two Bantam anti-tank missile groups, eight heavy machine-guns and two dozen MAGs were under platoon command on Tumbledown William. However his HQ at Felton Stream was too far back, an error compounded by having the Amphibious Engineers under Major Menghini co-located. Robacio was far too concerned with countering a possible attack from the south, and his rifle companies were therefore spread too thin. One company, even one with four rifle platoons like Captain Villarraza’s command (N Company), could not adequately defend both Tumbledown and William. Captain Cionchi’s M Company on Sapper Hill was behind wide belts of mines that required only a machine-gun platoon to cover them. The rifle platoons should have gone with the 81mm Mortar Platoon when it was sent to William, permitting N Company to concentrate on Tumbledown. The battalion reserve —O Company under battalion 2 i/c Major Pernias — was probably on the reverse slope at a point central to the whole defensive scheme, where the two hills offered some protection from naval gunfire and land artillery. Pernias sent a platoon under Sub- Lieutenant Quiroga reinforced by a section of Sappers, a total of thirty-seven men, to a position in front of William, covering Ponies Pass, where it was to play an equivocal and, from the British point of view, crucially important part in the battle.
Villarraza’s scheme for the defence of Tumbledown William was inflexibly set up to counter an attack from the south (see Map 31, p. 290). Most of his firepower eggs were in the basket of Sub-Lieutenant Bianchi’s platoon on William, with Sub- Lieutenant Oruezabala’s platoon in support from the military crest down among the stone runs. His third platoon, under Staff Sergeant Lucero, was posted to cover Moody Brook valley from an isolated position close against the northern cliff face of Tumbledown. When Robacio gave him another twenty-seven-man platoon from HQ Company, Villarraza sent it to the western end of Tumbledown, but told 2nd Lieutenant Vázquez his task was to bring the expected attack from the south under flanking fire. It is easy to see why he discounted an attack from the west: that end of Tumbledown is narrow, dauntingly steep and any advance up the hill is channelled into a narrow defile between rock walls, at the foot of which a twenty-five-man platoon of Marine Sappers under 2nd Lieutenant Mifio was located. An outcrop further to the west was not judged worth defending because an enemy advance from there would run into fire from Mifio’s position, which overlooked it, while the flanks were covered by MAGs at the western ends of Lucero’s and Vázquez’s positions. The position was further strengthened in the early morning of the 12th when Silva arrived with his fifteen-man RI 4 section from South Sister, and readily agreed to cover the gap between Mifio’s men and Vázquez’s right flank.* The ground in the area was well drained, permitting the defenders to construct deep dug-outs with steps up to narrow exits within strong sangars, some under overhanging boulders.
- Nobody would have attacked here — knowing it to be so strongly held — without smothering the defenders with artillery, but Scott was not granted the time to recce the objective and the outcrop prevented direct sight of the western end of Tumbledown from Goat Ridge.
British artillery fire. . . went up and down the mountain [which] quaked and shuddered under the impacts. The [phosphorus] shells were like flying kerosene tins filled with hot metal fragments… I saw them hit some soldiers near me and they burned through the thickest clothing, parkas, jackets, pullovers, everything, through to the flesh. I heard the cries of the wounded. . . calling for their comrades. . . twelve men before nightfall. We thought we had suffered before, but what luxury and comfort compared to this.
Without specific targeting information, Scott really had no choice but to order a silent advance to contact. Once battle was joined he would be able to call on naval gunfire from the three 4.5-inch guns of Yarmouth and Active in the gun line to the south. Unfortunately he took the advice of his inexperienced Battery Commander, Major Gwyn, over that of Naval Gunfire Observer Captain Brown, outranked but fresh from outstanding success in close support of 45 Commando on the Sisters, and before that at South Georgia and Pebble Island. During the battle Gwyn lost radio contact with his forward observers, but continued to believe he could target his guns more accurately than the Naval Gunfire Observer: an absurdity when the ships enjoyed the benefit of the computers and modern gunnery aids the RA had been obliged to leave behind. The result was that although Gwyn’s fire plan successfully isolated the western end of Tumbledown, and divided William from Tumbledown, the close support the infantry needed was denied to them for many hours. For his part, Vázquez had the utmost difficulty persuading his own gunners and mortar men to fire on his position — the enemy was in the open, his men safe in their dug-outs. He did not finally get the desired response until in exasperation he sent the gunners a request (via battalion commander Robacio, no less) to perform an unnatural act on themselves with their gun tubes.
ARGENTINE
5th Marine Infantry Battalion (RIM 5)
CO — Lt Col Robacio, RSM Hemández
2i/c — Lt Col Ponce, Ops — Maj Pernias
M Company (Sapper Hill) — Capt Cionchi
(RIM 3/C’s 4 x 120mm mortars, 3 HMG, 6 MAG)
RI 4 Group — Sub-Lt Llambias
RIM 3/C (under BIM 5 command) — Lt Binotti
N Coy (Tumbledown/William) — Capt Villarraza, CSM Nufiez
Forward Observer - 2Lt de Marco
1 Platoon — Sub-Lt Bianchi (2 Bantam AT, 2 x 10⁵ RCL, 3 HMG, 6 MAG)
RI 12 Group — Sub-Lt Mosterin
Mortar Platoon (from M Company) - WO Cuñé (6 x 81mm mortars)
2 Platoon — Sub-Lt Oruezabala (2 HMG, 3 MAG)
3 Platoon- SSgtLucem (60mm mortar, 3 HMG)
4 Platoon — 2Lt Vázquez/Sgt Fochesatto (60mm mortar, 3 MAG)
RI 4 Group — 2Lt Silva
Amph Eng 5 Platoon — 2Lt Mifio
O Coy — Maj Pernias
Ponies Pass Platoon — Sub-Lts Quiroga/Calmels
(3 x 60mm mortars, 4 MAG)
Amph Eng 1 section — 2Lt Valdéz Zabala
Heavy Weapons Group —2 Lt Galluzzi
(6 x 106mm mortars, 4 x 10⁵ RCL)
6th Mech Inf Regiment (RIM 6)— Maj Jaimet
B Coy — Lt Abella
1 Platoon — Sub-Lt de Ia Madrid
2 Platoon — Sub-Lt Franco
Comando 602/3 Platoon Capt Ferrero
Artillery Support Marine Batt (6 x 105mm) — 2Lt Abadal
GA3(12x 105mm)
BRITISH
2nd Battalion, The Scots Guards (2 SG)
CO — Lt Col Scott, RSM MacKenzie
2i/c — Maj Mackay-Dick, Ops — Capt Spicer
HQ Coy — Maj Bethell/CSM Braby (Ponies Pass)
G Coy — Maj Dalzell-Jobs
7 Platoon — Lt Johnson
8 Platoon — Lt Page
9 Platoon — 2Lt Blount/Sgt McDonald
LF (Left Flank) Coy — Maj Kiszely/CSM Nicol
Forward Observer — Capt Nicol
13 Platoon — 2Lt Stuart/Sgt Simeon
14 Platoon Lt Fraser
15 Platoon — Lt Mitchell
RF (Right Flank) Coy — Maj Price/CSM Amos
Forward Observer — Capt Miller
1 Platoon — 2Lt Dalrymple/Sgt Crawford
2 Platoon — Lt Lawrence/Sgt Robertson
3 Platoon — 2Lt Mathewson/Sgt Jackson (with Company 2i/c Capt Bryden)
Support (F) Coy — Capt Spicer
Anti-Tank Platoon — Capt Campbell-Lamerton
Recce Platoon — Capt Scott/Sgt Allum
Mortar Platoon (Harriet) — (6 x 81mm mortars, 6 x HMG)
42 Commando and 1/7 Gurklsas 6 x 81mm mortars each
9 Para Sq RE — Maj Davies/SSM Walker
3 Troop — Lt McManners Blues and Royals (2 Scorpions/2 Scimitars)
4 Troop — Lt Coreth
Artillery support 29/97 Batts, 4 Field Regt RA (9 x 105mm)
Battery Commander - Maj Gwyn
Active and Yarmouth (3 x 4.5-inch)
Naval Gunfire Observer — Capt Brown
4 comments:
Could you please tell me the source of the "Map 30 BIM5" used in your post, thx
could you please tell me the source of the MAP 30 BIM5 used in your post? Thx
Hi Stephan, sorry for the very delayed reply
Razor's Edge - Hugh Bicheno - Tumbledown
Steve
Easy thx - searching for this map in good resolution ;-)
Post a Comment